Hey everyone, welcome to my recipe site, If you're looking for new recipes to try this weekend, look no further! We provide you only the perfect Make-at-Home Ramen Jiro Regular Version recipe here. We also have wide variety of recipes to try.

Before you jump to Make-at-Home Ramen Jiro Regular Version recipe, you may want to read this short interesting healthy tips about Finding Healthful Fast Food.
Almost each and every “get healthy” and “weight loss” article you read will tell you to skip the drive through and make all of your meals yourself. This is really excellent advice. Sometimes, though, the last thing you need is to have to make an evening meal from scratch. Once in a while you just want to check out the drive through while you’re on your way home and complete the day. There is simply no reason that you shouldn’t be able to make it happen once in a while and be free of the guilt usually associated with “diet slips”. This is possible because plenty of the popular fast food destinations are trying to make their menus healthier now. Here’s how you’ll be able to eat healthfully while you are at a fast food spot.
Aim for the side dishes. It was not that long ago that all you could get at a fast food diner was French Fries. Today almost all of the most popular fast food franchises have enhanced their offerings. Now lots of them offer you salads. Chili is definitely another selection. Baked potatoes can even be bought. Fruit is generally available. There are a lot of options that don’t involve eating one thing deep fried. When choosing your dinner from the drive through, select a variety of side items instead of choosing a pre-made “meal deal”. This makes it possible for you to keep your calorie count low and lessen your fat intake.
Standard logic tells us that one certain way to get healthy and lose fat is to skip the drive through and to remove fast food restaurants from your thoughts. While this is usually a good suggestion all you need to do is make a couple of good choices and traveling to the drive through isn’t anything to worry about–when you do it in moderation. At times what you require most is just to have somebody else do the cooking. There isn’t any reason to feel guilty about visiting the drive through when you make healthy and balanced decisions!
We hope you got benefit from reading it, now let’s go back to make-at-home ramen jiro regular version recipe. You can cook make-at-home ramen jiro regular version using 26 ingredients and 24 steps. Here is how you do it.
The ingredients needed to make Make-at-Home Ramen Jiro Regular Version:
- Take Fresh Ramen Noodles (enough for 750 g of dough)
- Take 116 grams x 3 ○Strong bread flour
- Use 54 grams x 3 ○Cake flour
- Use 72 ml x 3 ○Water
- Provide 7 grams x 3 ○Salt
- Prepare 3 grams x 3 ○Bicarbonate of soda
- Get Soup
- Get 1 ◇Pork belly on the bone
- Provide 1 +2 liters ◇Water
- Take 1 clove ◆Garlic
- Provide 25 grams ◆Cabbage cores
- Get 10 cm ◆Green portion of Japanese leeks
- Take 1 pinch ◆Ginger
- Get 1 +80 grams □Pork fatback
- Take Meat sauce baste
- Use 250 ml ▽Soy sauce
- You need 75 ml ▽Mirin
- Take 100 ml ▽Sake
- Use 2 grams ▽Salt
- Provide Toppings
- Get 1 +300 grams ◆Pork
- You need 1 +2 leaves ●Cabbage
- Use 1 +4 packages ●Bean sprouts
- Provide 1 ◎Minced garlic
- Provide A must for authentic Jiro Ramen
- Get 1/2 tsp per bowl ☆ Umami seasoning
Instructions to make Make-at-Home Ramen Jiro Regular Version:
- Make the noodles with the ○ ingredients. You can make about 2 servings at a time using a normal bowl. Make it in several batches or use a large container.
- Once the dough is complete, make the noodles, and let ferment for about a week. About 2~2.5 mm thick noodles look authentic, but cut them to your liking.
- Remove the blood from the pork belly bones, and boil in hot water for 20-40 minutes. If you don't do this prep work, then the color and taste will be bad.
- Wash the pork belly bones clean, break apart and add to the pot, with 2 liters of water. Bring to a boil. I think there won't be a lot of scum, but discard any that comes out.
- Once scum has stopped seeping out, transfer to a pressure cooker, and set the switch. If cooking on the stovetop, keep a steady heat.
- After cooking for about 2 hours in a pressure cooker, check the pot contents. A lot of oil will have rendered out of the pork belly bones.
- Removing this pork marrow broth will lighten the soup base and discard the smell, but also will remove the umami from the vegetables. You could discard it if you prefer, but if you're using it, just lessen the amount of backfat.
- Repeat Steps 6 and 7 once more, and ideally cook down for about 4 hours. When there is not enough water, add in more so you are not heating the pot without water.
- Prepare the pork. If you don't mind the shape, then you don't need to tie it up with butcher's twine. Use shoulder roast, belly meat, or a block.
- The sizes of the pots at my work and the ones I have at home are different sizes. The amount of ingredients listed above for the vegetables is sufficient. You won't get the aroma of the pork belly bones if you add too many veggies.
- The aroma of the ginger is strong, so this uses an extremely small amount. If using tubed ginger, use about 5 mm. When using fresh ginger, use the photo as a reference (about a quarter size).
- Add in the ◆ ingredients (included the pork meat), and cook again. Cooking for 25 minutes when using shoulder roast or 30 minutes when using pork belly meat is ideal in a pressure cooker (Reserve this for the broth in Step 15).
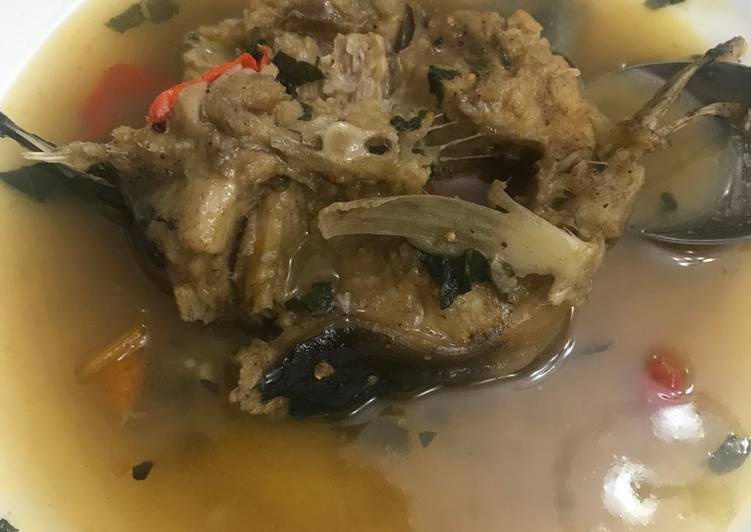
- Prepare the basting sauce and add in the cooked pork. Heat the meat and cool it down more than once, sealing in the meat flavoring.
- If you marinate for too long, the flavor will become too strong, so take it out once you think it's done (taste and see. Store the meat and the basting sauce (now soup base) for later.
- If you have the time, boil down the broth for longer. (The one shown in the photo has been cooked for about 8 hours).
- Next, add in the back fat. When using as a topping, It will shrink more than you think, so add in lots (I used 120 g in the photo).
- Cook for 45 minutes even when using a pressure cooker. It is convenient to make it together and store the cooked bits in a container.
- The amount of soup needed changes depending on the toppings used, but it may be best to prepare 1.1 - 2 liters for 3 bowls.
- In truth, you need 3 gas burners to make the best Jiro Ramen. (I ideally want four).
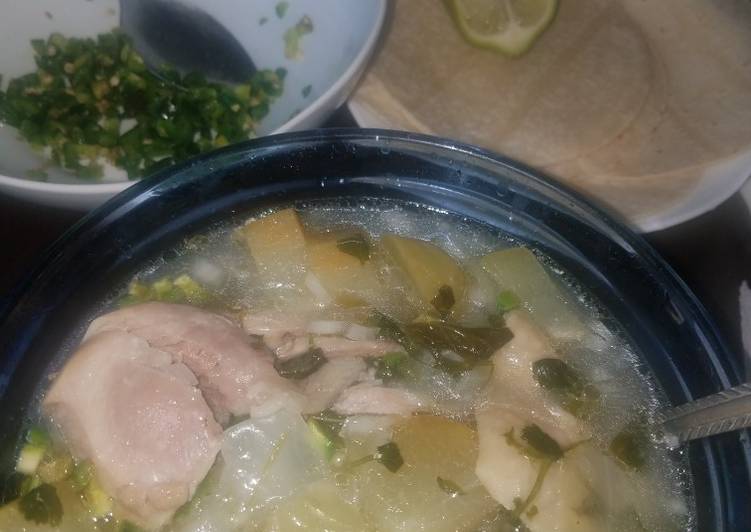
- Prepare the noodles and vegetables by boiling in separate pots, and boil the soup as well or boil the vegetables in the soup.
- Add the sauce, back fat and umami seasoning into a bowl. From here on, work quickly.
- Warm up the veggies. In winter, just put them on top, the hot soup will cook them. Aadd them in right after noodles finish boiling.
- After you have boiled the noodles to your desired firmness, completely drain the water. Add broth and the noodles. Top with pork and vegetables, and it is done.
- Adjust the spiciness, amount of grease, and amount of veggies to your liking! The toppings are big so it hard to see, but it has 1.5 bags of bean sprouts.
If you find this Make-at-Home Ramen Jiro Regular Version recipe valuable please share it to your close friends or family, thank you and good luck.